
Ever wondered what to do with all the amazing produce you discover when browsing our bountiful local farmers’ markets? Our local food expert, Lynda Balslev, serves up recipes sure the showcase our county’s ingredients as well as delight the tastebuds.
Small Bites
Entrées
Other
Appetizers
Hot and Sweet Pepper Crostini
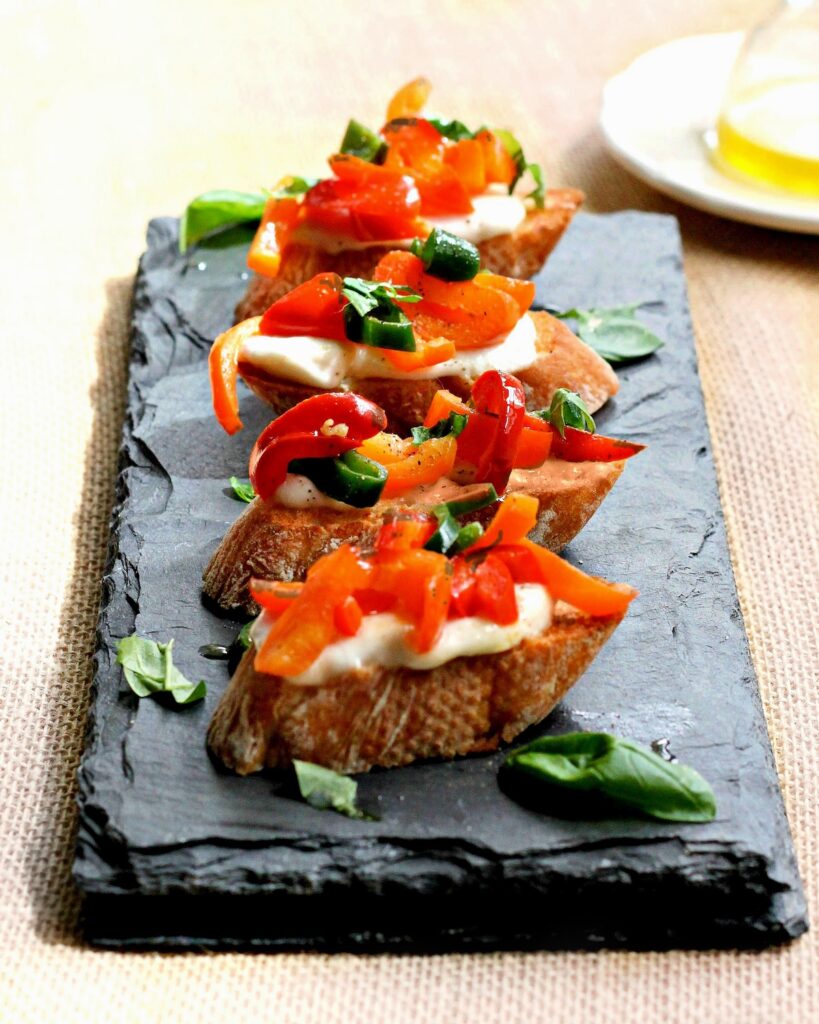
The end of summer reaps bushels of pert and squiggly peppers in a kaleidoscope of color. It’s easy to shop with our eyes and gather too many, when sweet bells and gnarly Jimmy Nardellos, pristine cherries and earthy poblanos vie for our attention. What to do with this bounty?
This simple recipe addresses the question by showcasing a vibrant pepper medley perched on top of crostini. It makes for a great appetizer or light lunch. Use a mix of sweet and hot peppers for a more complex flavor and a nudge of heat. Feel free to mix and match a selection of peppers to your taste.
When working with hot peppers, such as poblanos, serranos and jalapeños, remember that they can vary in heat from one pepper to the other, so take a small bite to test their strength. The heat is concentrated in the ribs and seeds of the pepper, so remove as much as desired with kitchen gloves or the tip of a paring knife to protect your fingers from the oils.
Ingredients
Crostini:
- 1/4 cup extra-virgin olive oil
- 1 small garlic clove, grated
- Pinch of kosher salt
- 8 slices baguette, cut on the diagonal, about ½-inch thick
Topping:
- 1 tablespoon extra-virgin olive oil
- 1 1/2 pounds mixed sweet and hot peppers, stemmed and seeded, thinly sliced
- 1 garlic clove, grated
- 1/2 teaspoon kosher salt
- 1/4 teaspoon crushed red pepper flakes (or freshly ground black pepper)
- 8 ounces buffalo mozzarella, halved and thinly sliced
- Torn basil leaves, for garnish
- Balsamic vinegar, for drizzling (optional)
Directions
Make the crostini:
Heat the oven to 375°F. Whisk the oil, garlic and salt in a small bowl. Arrange the bread on a baking sheet and lightly brush each side with the oil. Transfer to the oven and bake until the bread is lightly toasted, 12 to 15 minutes, turning once. Remove the bread from the oven.
Prepare the topping:
1. Preheat the oven broiler.
2. Heat the oil in a large skillet over medium heat. Add the peppers and sauté until crisp and tender, 3 to 4 minutes. Add the garlic, salt and red pepper flakes and sauté until fragrant, about 30 seconds. Remove from the heat.
3. Arrange the mozzarella slices on the crostini. Mound some of the peppers over the cheese. Transfer the crostini to a rack in the top third of the oven and broil until the cheese begins to melt and the peppers begin to color in spots, about 1 minute.
4. Remove from the oven and garnish with fresh basil and a few drops of balsamic vinegar. Serve immediately.
Yields 8 crostini
DISH DETAILS: appetizer, vegetarian, summer, entertaining
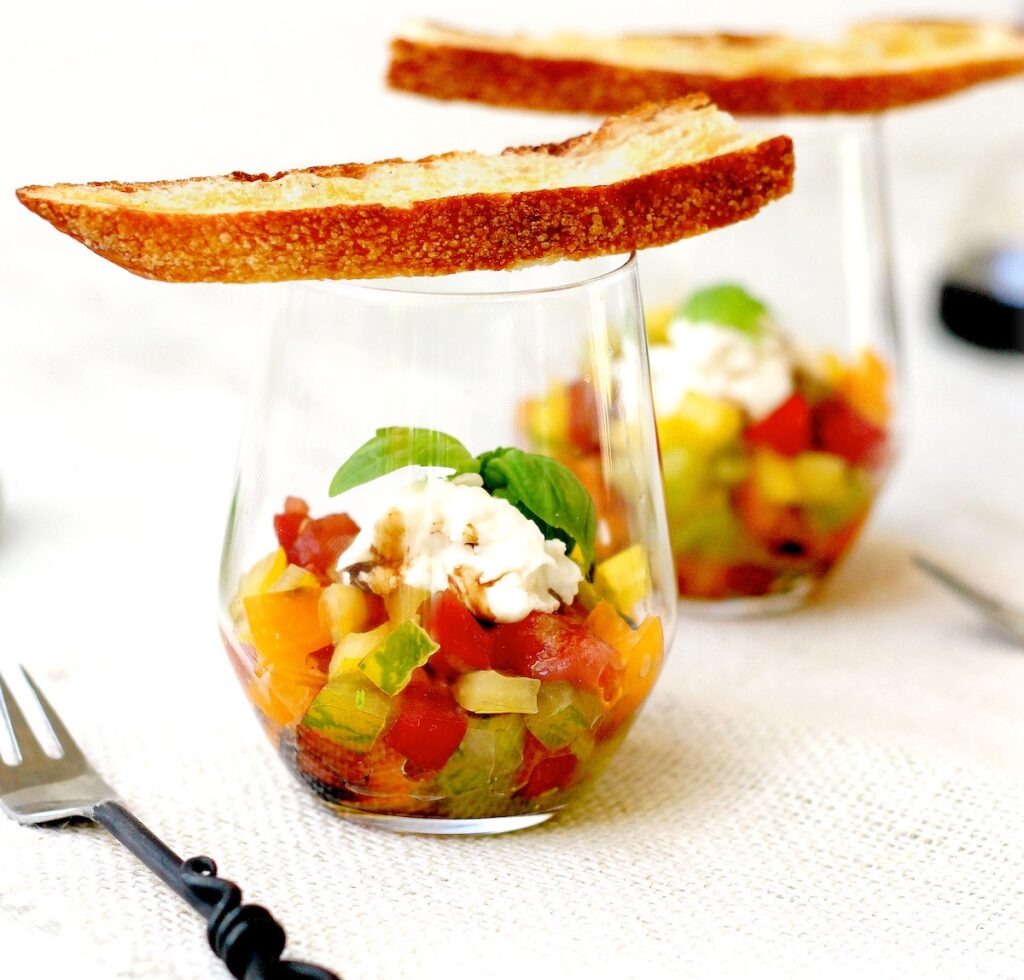
Tomato Tartare “Caprese”
At the height of summer, sun-kissed tomatoes take center stage at the farmers market. They dazzle with an array of bright colors and varietals on offer. From the deep and murky wine-stained heirlooms, to the juicy acidity of brilliant Early Girls, to the refreshing sweetness of tiny Sun Golds, every variety contributes to a kaleidoscope of colors and flavor.
This recipe celebrates the beauty and diversity of peak season tomatoes, letting them shine as the stars of a light and fresh appetizer, amplified by a few thoughtful ingredients. Best of all it encourages indulging in a generous sampling of tomato varieties to create a dish that not only tastes delicious but is visually appealing. Inspired by the classic ingredients of an Italian caprese salad — juicy tomatoes, creamy mozzarella and fragrant basil — this dish reimagines the salad with a little knifework and creative layering, transforming the traditional salad into a colorful and refined appetizer that’s both easy to serve and fun to eat.
Think of it as a savory summer parfait: a vibrant medley of diced tomatoes, topped with a luscious dollop of buffalo mozzarella and delicate ribbons of fresh basil, then laced with a velvety balsamic reduction. A crunchy crostini plank serves as both a garnish and tasty utensil for scooping the tomatoes and soaking up the sweet juices.
Ingredients
Syrup:
- ⅔ cup balsamic syrup
- 1 garlic clove, lightly smashed
- 1 tablespoon lemon juice
- Pinch of salt and freshly ground black pepper
Crostini:
- 6 to 8 slices of baguette, sliced on the diagonal, about 4 inches in length and ¼-inch thick
- Extra virgin olive oil
- 1 large garlic clove, lightly smashed
- Kosher salt
Tomatoes:
- 1½ to 2 pounds assorted tomatoes, seeded, cut in ¼-inch dice
- 2 tablespoons extra-virgin olive oil
- ½ teaspoon kosher salt
- ¼ teaspoon freshly ground
- Black pepper, plus extra for garnish
- 2 fresh buffalo mozzarella rounds, each about 4 ounces
- 6 to 8 basil leaves
Directions
Syrup:
Place the vinegar, garlic, lemon juice, salt and pepper in a small saucepan. Bring to a boil and simmer until reduced by about half and slightly syrupy, 3 to 4 minutes, stirring occasionally. Discard the garlic clove. Transfer the syrup to a bowl and cool to room temperature.
Crostini:
Preheat the oven broiler or grill. Lightly brush the baguette slices with olive oil. Rub each slice with the garlic clove and sprinkle with a pinch of salt. Arrange in one layer on a baking tray and broil until lightly golden on both sides, turning once. (Or grill until lightly charred on both sides.) Set aside.
Caprese
1. In a bowl, combine the tomatoes, oil, salt and black pepper, gently stirring the mixture. Taste for seasoning. If desired, add a pinch of sugar.
2. Divide the tomatoes evenly between serving glasses or small bowls. Tear the mozzarella into 6 to 8 chunks, then place a chunk in each glass over the tomatoes. Drizzle with 1 to 2 teaspoons balsamic syrup.
3. To chiffonade the basil, stack the leaves, roll them lengthwise and thinly slice the roll. Sprinkle the basil over the tomatoes. Garnish with additional black pepper and serve with the crostini.
Serves 6 to 8
DISH DETAILS: salad, vegetarian, gluten–free, summer, easy
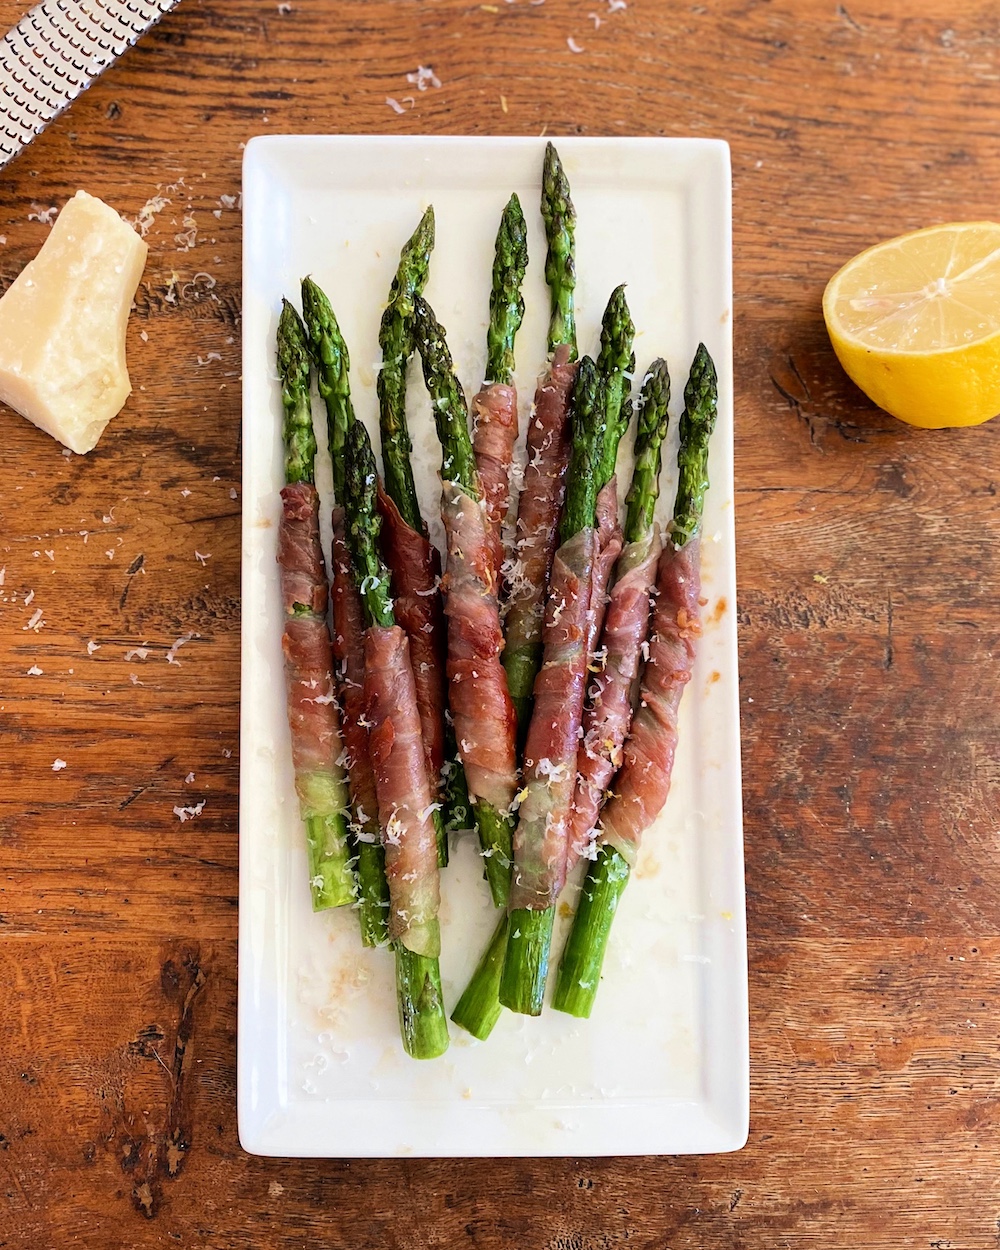
Prosciutto Wrapped Asparagus
Springtime heralds a bounty of tender green asparagus spears at the farmer’s market. Nothing beats the sweet, grassy flavor of fresh asparagus, which peak in April and May. Not only are they delicious harbingers of the new season, green asparagus are a powerhouse of nutrients: naturally rich in potassium, folate and vitamins A, C, E and K. And they are low in calories, to boot.
When choosing asparagus, select rigid (not floppy) stalks with dark, firm tips. To store, trim the ends and refrigerate upright in an inch of water to maintain freshness. When ready to cook, snap off the ends — the woody ends should naturally break off when the stalks are bent at their base. Thinner asparagus are more tender in flavor and require little time to cook. A quick blanch or a few minutes to steam is all that’s needed, whereas the thicker, more fibrous asparagus stalks take more time and are ideal for grilling and roasting, which will coax out their natural nutty sweetness. You can also eat asparagus raw. In which case, opt for thinner, more tender stalks, and enjoy as a crudité or shave the spears into salads.
This recipe embraces the simplicity of the asparagus stalk, with a mere three ingredients and minutes to prepare. You can prep them in advance, so they are ready to pop into the oven or on the grill when you want to serve.
There are a few simple tips to ensure success:
- You can certainly splurge and use luscious, supple prosciutto di Parma to wrap the spears. However, feel free to substitute a less expensive prosciutto-style ham. The key to these asparagus is to slightly dry out and crisp the prosciutto while roasting, and the nuance of a finer ham may be lost (along with the extra pennies you spend on it).
- Choose asparagus of equal thickness to ensure even cooking time. Avoid thin asparagus, since they will cook very quickly, losing their brightness and firmness before the prosciutto is cooked. Medium-thick stalks are best. Once cooked, the asparagus should be tender but firm, not limp.
Ingredients
- 12 medium-thick asparagus spears, about 1 pound
- 2 to 3 ounces prosciutto (at least 6 slices), halved lengthwise
- Extra-virgin olive oil
Optional garnishes:
- Finely grated lemon zest
- Finely grated Parmigiano Reggiano
Directions
1. Heat the oven to 400°F or prepare a grill for indirect cooking over medium heat.
2. Snap off the tough woody ends of the asparagus and neatly trim the stalks with a knife.
3. Place a piece of prosciutto on a work surface. Arrange a spear at the base of the prosciutto and tightly wrap the ham up around the spear, on the diagonal. Place on a rimmed baking sheet lined with parchment or on a grill pan and repeat with the remaining asparagus. Lightly brush the asparagus with oil.
4. Cook until the asparagus are tender but still firm, bright green in color, and the ham begins to dry and crisp, 10 to 12 minutes. Remove from the oven or grill and garnish with lemon zest or grated cheese, if desired. Serve warm.
Makes 12; serves about 4 as a light appetizer
DISH DETAILS: appetizer, vegetable, side dish, easy, entertaining, spring, Easter
Soups and Stews
Mushroom Bourguignon
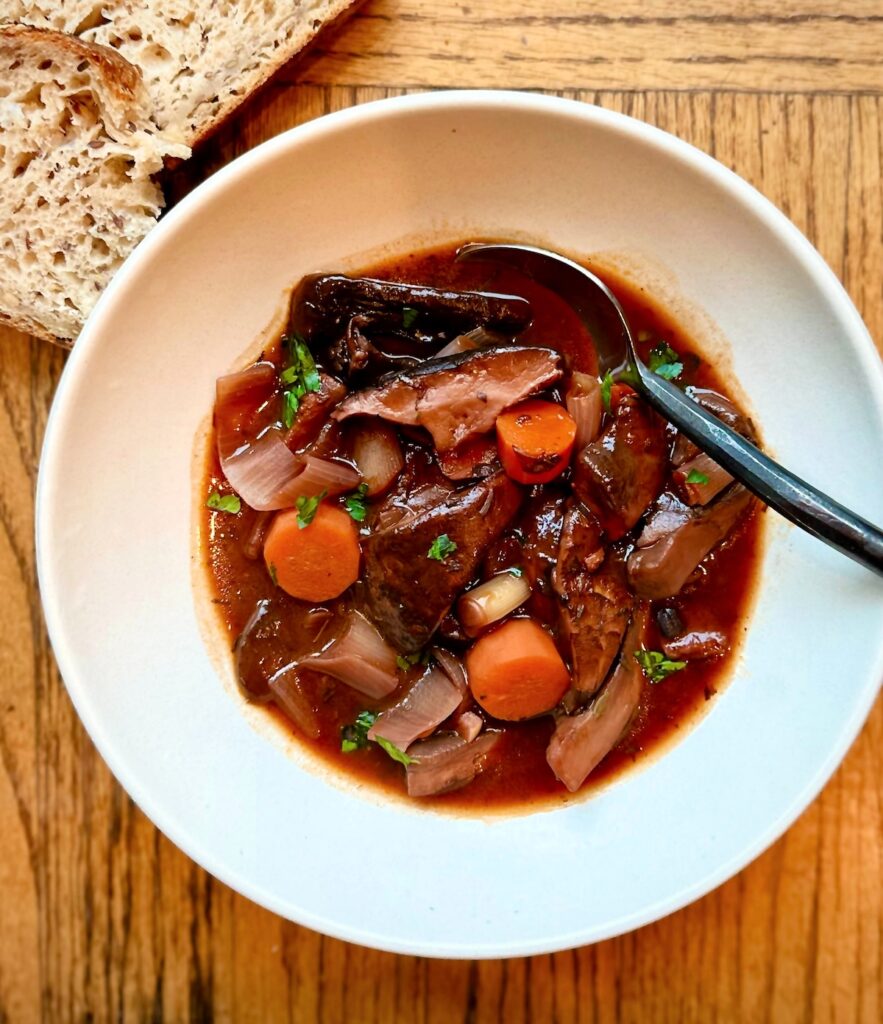
Chances are that this vegetarian stew will satisfy any meaty craving. The method for this vegetarian recipe is based on beef bourguignon, a French classic that includes beef and red wine — minus the beef. Mushrooms handily step in as the main ingredient. Not only are they known for their meaty consistency and heft, but they also contain glutamate, an amino acid which provides savory, rich umami qualities to food. True, mushrooms do not provide the same amount of protein as meat, but they do have a higher protein content than most vegetables, and they carry a treasure trove of nutrients. Mushrooms are a rich source of fiber, vitamins and antioxidants, and they are fat and carbohydrate free.
For this stew, take advantage of the mushroom season, and choose a variety of wild mushrooms when available. Shiitake, portobellos and brown cremini mushrooms are a great starting point. Choose mushrooms with firm caps and store them in open paper bags in the refrigerator to allow them to breathe. To clean mushrooms, rub with a damp paper towel and use a brush to take away any dirt. You can run them under a trickle of water, if needed, but don’t douse or submerge them, because they will act like sponges and absorb the liquid. Trim the ends and thickly slice or halve the shiitake and cremini mushrooms. To clean the portobellos, trim the stems and scoop away the gills. Cut the portobellos in bite-size chunks or thickly slice.
Ingredients
- Extra-virgin olive oil
- 2 1/2 pounds assorted mushrooms
- Kosher salt and freshly
- Ground black pepper
- 4 shallots, peeled, thickly sliced
- 2 carrots, thickly sliced
- 3 cloves garlic, minced
- 1 teaspoon dried thyme
- 2 tablespoons tomato paste
- 2 cups full-bodied red wine
- 1 1/2 cups mushroom or vegetable stock, or more as needed
- 1 bay leaf
- 1 to 2 tablespoons balsamic vinegar
- 1 tablespoon brown sugar
Directions
1. Heat 1 tablespoon of oil in a large Dutch oven or deep skillet over medium-high heat. Add the mushrooms (in batches if necessary) and lightly season with salt and pepper. Cook until they begin to release their juices and brown at the edges, about 6 minutes, stirring frequently. Transfer to a bowl.
2. If the pan is dry, add 1 tablespoon of oil. Add the shallots and carrots and lightly season with salt and black pepper. Sauté over medium heat until the vegetables begin to soften and the carrots brighten in color, about 4 minutes.
3. Add the garlic and thyme and sauté until fragrant, about 1 minute more. Add the tomato paste and stir for about 30 seconds to coat the ingredients and cook the tomato paste.
4. Pour in the wine and deglaze the pan, stirring up any brown bits, then add the stock and bay leaf.
5. Return the mushrooms to the pan. If they’re not covered with liquid, add more stock to cover. Bring to a boil, then reduce the heat to medium-low. Partially cover the pot and simmer until the vegetables are tender, about 30 minutes.
6. Remove the lid and continue to simmer to slightly reduce and thicken the liquid, about 10 minutes. Stir in 1 tablespoon vinegar and the brown sugar, and taste for seasoning. Add additional vinegar and salt if desired.
7. Ladle into bowls and garnish with parsley. The stew can be prepared up to one day in advance of serving. Refrigerate until use, and gently rewarm to serve.
Serves 4 to 5
DISH DETAILS: one-pot, vegetarian, gluten-free, fall, winter, stew, recipe
Salads
Grilled Watermelon and Feta Salad
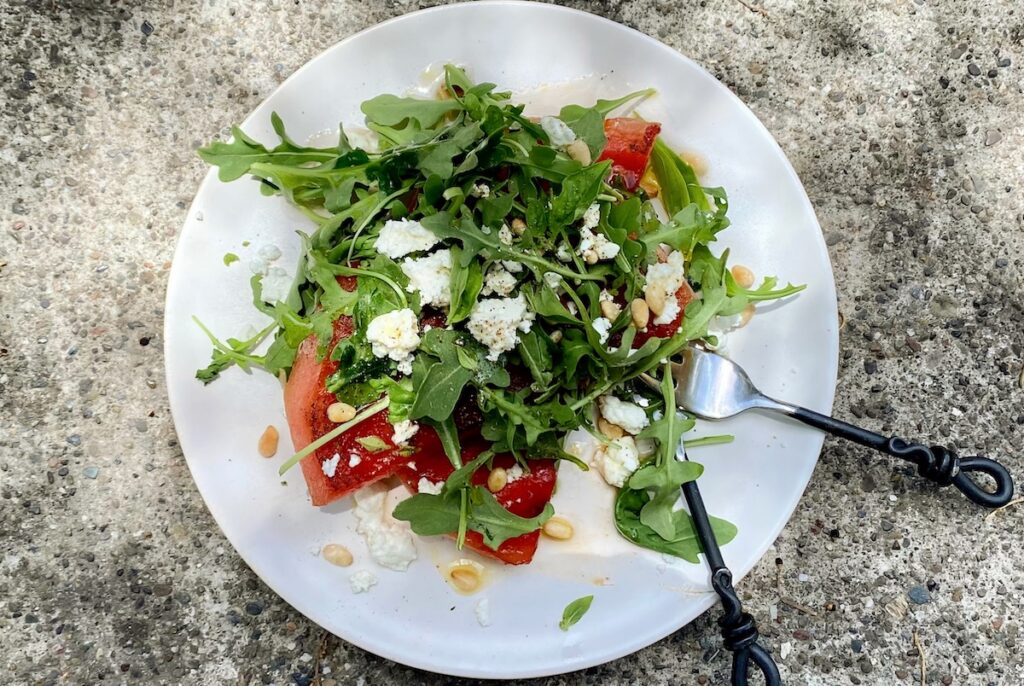
Before reaching for a chilled slice of watermelon, consider putting it on the grill. At its peak from late spring through summer, watermelon is at once intensely juicy and naturally sweet, which are qualities that deepen with a quick sear. The heat lightly caramelizes the fruit’s surface and adds a hint of smoke, transforming this warm-weather staple into something unexpectedly sophisticated.
Beyond its refreshing flavor, watermelon is rich in hydration and packed with vitamin C, vitamin A and the antioxidant lycopene, making it as nourishing as it is cooling on hot days. Paired with peppery arugula and briny feta, the charred melon becomes the centerpiece of a salad that balances sweet, salty and savory in every bite. Bright, fresh and effortlessly elegant, it’s a dish made for warm al fresco evenings at the table.
Ingredients
- 1 small seedless watermelon, 3 1/2 to 4 pounds
- Olive oil
- Kosher salt
- 2 tablespoons white balsamic vinegar
- 1 tablespoon fresh lime juice
- 2 teaspoons runny honey
- 1/4 teaspoon freshly ground black pepper
- 2 to 3 heaping cups baby arugula leaves
- 2 ounces crumbled feta
- 1/4 cup fresh mint leaves, torn
- 2 tablespoons pine nuts, toasted
- Finely grated lime zest, for garnish
Directions
1. Cut four center-cut slices of the watermelon, each about 3/4-inch thick. Cut each slice in half and trim the rind. Lightly brush the slices with oil and season with a light pinch of salt.
2. Whisk 3 tablespoons olive oil, the balsamic vinegar, lime juice, black pepper and 1/4 teaspoon salt in a small bowl.
3. Arrange the watermelon on the grill grates over direct medium heat (or on a preheated stovetop griddle over medium heat). Grill the slices until marked on both sides, 4–6 minutes. Transfer to a plate. Lightly brush with some of the dressing. Cool to room temperature.
4. Arrange two watermelon slices on each serving plate. Mound the arugula over the watermelon. Sprinkle the feta, mint and pine nuts over the plates. Drizzle with the remaining dressing to your taste. Serve garnished with lime zest.
Serves 4
DISH DETAILS: salad, summer, fruit, vegetarian, grill, gluten-free, entertaining
Black Lentil Salad With Frisée and Mizuna
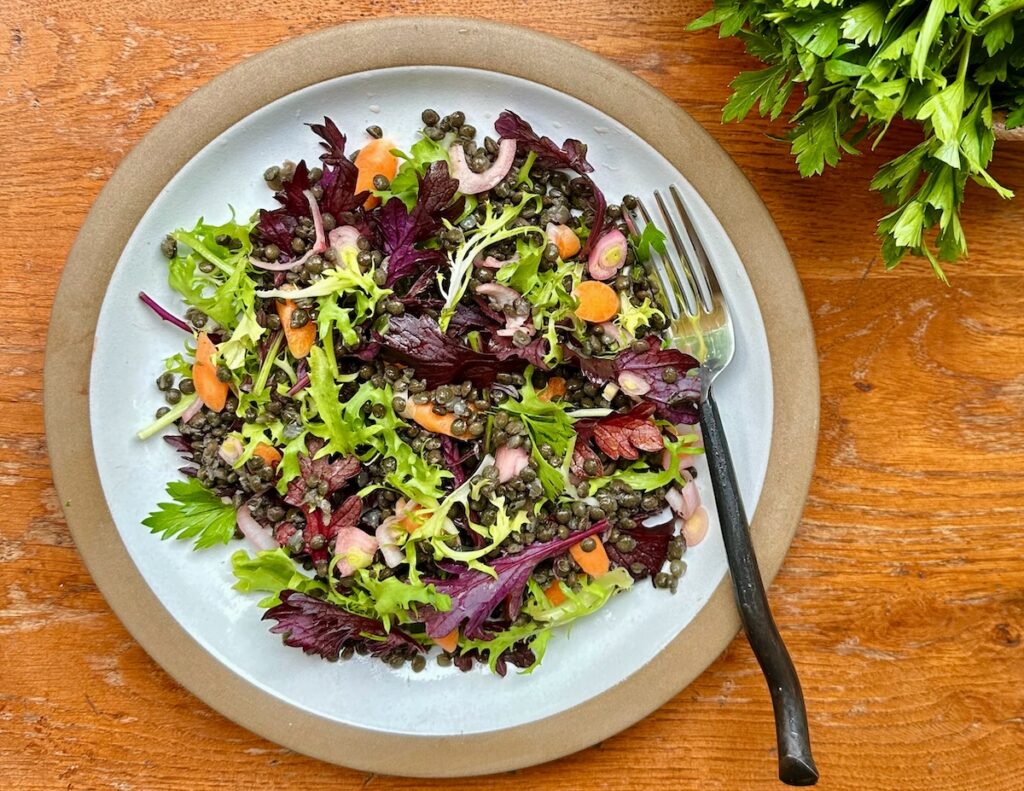
This leafy shoulder-season salad celebrates late winter greens at their peak. A vibrant and nourishing mix of frisée and mizuna leaves, tossed with tender black lentils, create a fresh and satisfying dish that works equally well as an elegant opener or a healthy meal on its own.
Frisée, a curly variety of endive, is known for its pale green to yellow tips and mildly bitter leaves. Mizuna, a Japanese mustard green, contributes a peppery bite and a delicate, feathery texture to the salad. Small but mighty black lentils offer an excellent source of plant-based protein along with key nutrients including iron, folate, magnesium and potassium. Unlike green, brown or red lentils, they hold their shape when cooked, which makes them especially well-suited for salads.
This salad is inspired by the classic Salade Lyonnaise, a French staple that consists of frisée, lardons (diced pieces of smoked pork or slab bacon, pan-fried until the fat renders and the pieces turn golden and crisp), croutons and a runny egg. It weaves curly frisée and red mizuna through a bowl of black lentils, studded with quick-pickled shallots and coated in a thick Dijon vinaigrette. And for a non-vegetarian option, crispy lardons can be folded into the lentils.
Ingredients
Salad:
- 1 cup black lentils (yields about 2 1/2 cups cooked)
- 2 thyme sprigs
- 1 bay leaf
- Kosher salt
- 3 small shallots
- Red wine vinegar
- 1 to 2 narrow carrots thinly sliced
- 4 cups mixed frisée and mizuna, torn in bite-size pieces
- 2 tablespoons chopped Italian parsley leaves
- 2 tablespoons chopped fresh tarragon leaves
- 1 teaspoon finely grated lemon zest
Directions
1. Rinse and sift through the lentils for any small stones. Put the lentils, thyme, and bay leaf in a large saucepan and cover with water by about 2 inches. Bring to a boil over medium-high heat. Reduce the heat to medium-low and partially cover the pot. Simmer until the lentils are tender but still hold their shape, about 25 minutes. Drain the lentils and transfer to a bowl. Lightly season with salt. Cool to room temperature.
2. While the lentils are cooking, halve the shallots lengthwise and thinly slice. Place in a bowl and add enough red wine vinegar to nearly cover. Let stand for at least 20 minutes, stirring once or twice.
3. Combine the lemon juice, garlic, mustard, salt, and black pepper in a small bowl. Strain the red wine vinegar from the shallots into the bowl and whisk to blend. Add the oil in a steady stream, whisking to emulsify. Taste for seasoning.
4. Toss the lentils with 1 tablespoon of the vinaigrette in a large bowl. Add the carrots, greens, parsley, and tarragon to the bowl. Sprinkle the lemon zest over and drizzle with additional dressing to your taste. Gently toss to combine, then serve.
Serves 4
DISH DETAILS: salad, side dish, gluten-free, vegetarian, legumes, entertaining
Chicory Salad With Orange and Fennel
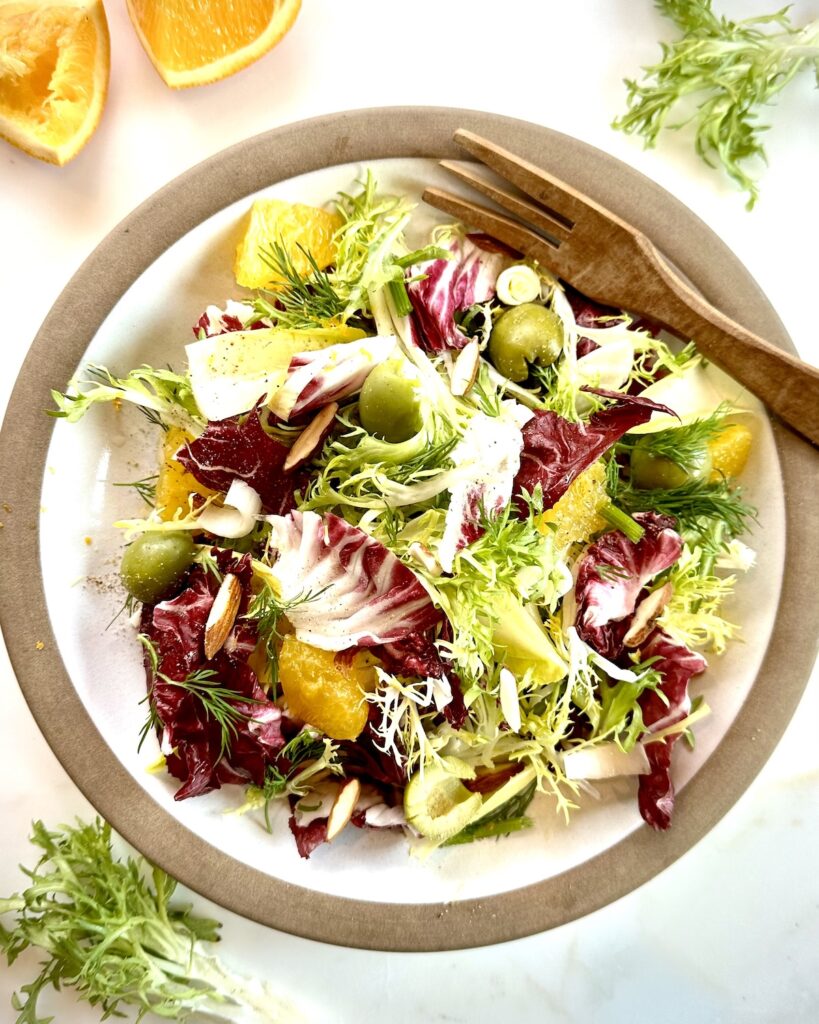
It takes a bold and bright salad to tackle a winter day, and this chicory, orange, and fennel salad rises to the challenge. Winter chicories are a group of bitter ‘greens’ that include radicchio, Treviso, endive, escarole, frisée and puntarelle — all of which are notably not-so-green but streaked in reds and purples or cast in winter whites and celadon. These hardy leaves thrive in a cold-season salad, inviting equally punchy ingredients to join the bowl.
Sweet zingy citrus (another winter staple) plays an equally important role in this salad. Orange zest and segments are scattered among the leaves which are dressed in an orange-infused vinaigrette. Icy fennel shards add crisp anise notes, and the chopped fronds provide a frizzy aromatic lift. The supporting cast in this bowl is small but mighty: quick pickled shallots, briny green olives and toasty roasted almonds. The result is a winter salad that’s vibrant, balanced and energizing, with each ingredient amplifying the next to chase away any trace of seasonal fatigue.
Ingredients
- 1 medium shallot, thinly sliced, about 1/4 cup
- 4 tablespoons fresh orange juice, divided
- 1 tablespoon sherry vinegar
- 1/2 teaspoon finely grated orange zest
- 1/4 teaspoon kosher salt
- 1/8 teaspoon freshly ground black pepper
- 1/3 cup extra-virgin olive oil
- 1 navel orange
- 1 small fennel bulb
- 1 small head radicchio, cored, leaves torn in bite-size pieces
- 1 small head frisée, leaves torn in bite-size pieces
- 1 to 2 endive, ends trimmed, leaves cut in bite-size pieces
- 8 to 10 pitted Castelvetrano olives, halved
- 1/4 cup raw almonds, toasted, coarsely chopped, divided
Directions
1. Combine the shallot and 2 tablespoons of orange juice in a small bowl. Stir to coat. Let stand for 15 to 20 minutes.
2. In a separate small bowl whisk the remaining 2 tablespoons orange juice, the vinegar, orange zest, salt, and black pepper. Drizzle in the oil, whisking to emulsify.
3. Supreme the orange: With a sharp paring knife, cut away the skin and white pith. Using the tip of the knife cut each segment away from the membrane; discard the membrane and place the segments in a bowl.
4. Remove the stalks from the fennel bulb. Halve the bulb lengthwise and thinly slice. Pull off and reserve the fennel fronds from the stalks.
5. Combine the radicchio, frisée and endive in a bowl. Add the shallots, orange segments, sliced fennel bulb, olives and half of the almonds and gently toss with half of the dressing, adding more dressing to your taste.
6. Sprinkle the remaining almonds over the salad and garnish with the fennel fronds.
Serves 4
DISH DETAILS: salad, side dish, appetizer, gluten-free, winter salad, citrus, fruit, vegetarian, entertaining
Delicata, Radicchio and Black Rice Salad
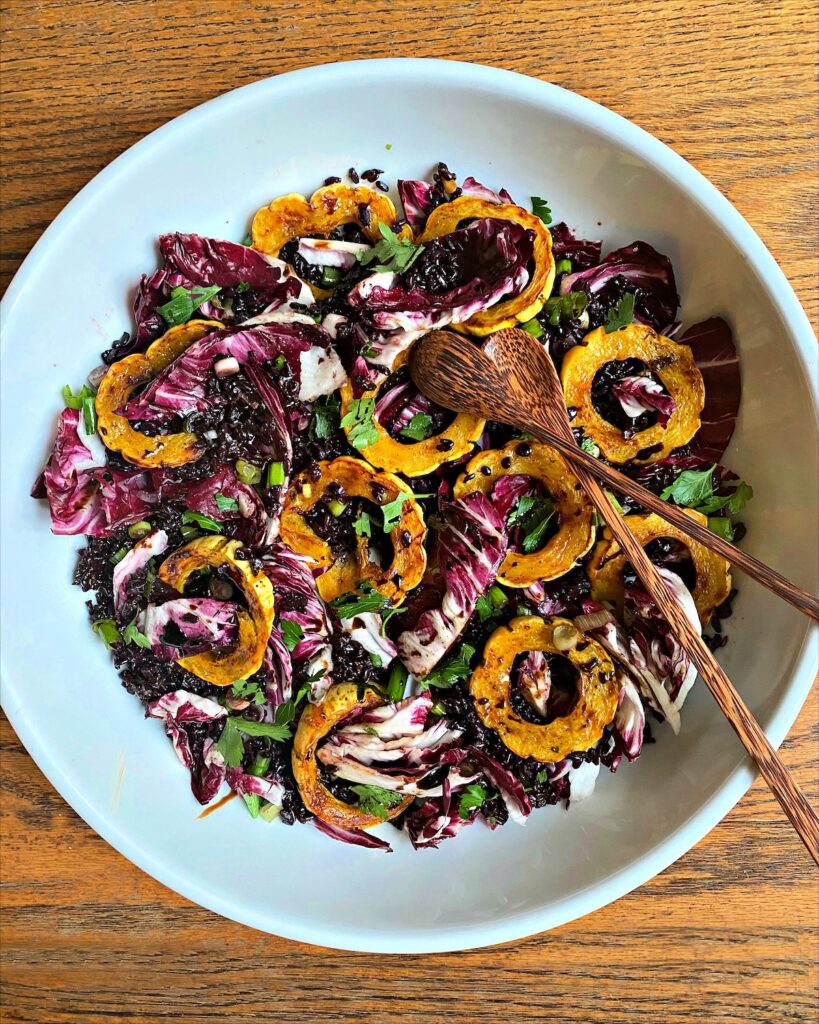
The fall season invites layers — not just in clothing and bedding, but also in our food. Cooler weather encourages us to add extra heft and nourishment to our meals, and salads are no exception. They can handle it.
This autumn-forward salad stacks nutty black rice, juicy-crisp radicchio and golden roasted delicata squash. Each ingredient brings texture and hearty flavor, but it’s the delicata that shines — sweet, creamy and nutrient-rich.
Often overlooked for butternut, delicata squash deserves more attention. Its tender striped skin is edible, which means no peeling is required, and roasting amplifies its naturally sweet flavor. Just as importantly, delicata is loaded with nutrients: it’s an excellent source of vitamin A, rich in potassium and provides dietary fiber that aids digestion. It also contains vitamin C, iron and magnesium, making it a small squash with big nutritional impact. When sliced into thin rings, it doubles as both decoration and nourishment.
Best of all, this salad can be prepped ahead: cook the rice and roast the squash in advance, then cool them to room temperature. The final assembly takes just minutes — a true gift for busy holiday cooks.
Ingredients
Dressing:
- 1/3 cup extra-virgin olive oil
- 1/4 cup balsamic vinegar
- 1 small garlic clove, minced
- 1/4 teaspoon freshly ground black pepper
Salad:
- 1 cup black rice
- Kosher salt
- 1 large or 2 small delicata squash
- 1 to 2 tablespoons extra-virgin olive oil
- 1 teaspoon ground cumin
- 1/2 teaspoon freshly ground black pepper
- 1 large head radicchio, cored, leaves torn
- 2 to 3 scallions, thinly sliced
- 1/4 cup chopped Italian parsley
- Pepitas and/or dried cranberries, for garnish
Directions
1. Whisk the dressing ingredients in a small bowl. Set aside.
2. Cook the rice, according to package instructions. Season to taste with salt and set aside to cool.
3. Heat the oven to 400°F. Line a baking sheet with parchment.
4. Cut the squash crosswise in 1/3-inch-thick slices; scoop out the seeds. Place the rings in a large bowl.
5. Add the oil, 1 teaspoon salt, cumin and black pepper and toss to coat.
6. Arrange the squash rings in one layer on the baking sheet. Transfer to the oven and roast until tender and golden brown in spots, about 25 minutes, flipping once.
7. Remove from the oven and lightly brush with the dressing. Cool to lukewarm or room temperature.
8. Spread the radicchio in a serving bowl. Stir the scallions into the rice and then spoon the rice over and around the radicchio.
9. Arrange the delicata rings over the salad, tucking some of the rings under the radicchio leaves.
10. Garnish with parsley and the pepitas/dried cranberries, if using. Drizzle with the remaining dressing to your taste.
Serves 4
DISH DETAILS: salad, side-dish, grains, vegetarian, gluten-free, fall, winter, entertaining, Thanksgiving
Meat and Fish
Shrimp Primavera Risotto

Springtime presses the reset button at the farmers’ market. As winter fades, the market tables shift from presenting earthy roots and sturdy crucifers to displaying tender leaves and baby vegetables. Bunches of young asparagus and sweet peas help to announce the season. Prepare these new arrivals in a risotto. A risotto’s creamy texture and subtle flavor provide an ideal canvas to highlight the season’s delicate vegetables.
This recipe is inspired by Pasta Primavera. Primavera, meaning “spring” in Italian, aptly sums up the essence of this dish. Featuring new asparagus, spring peas and briny shrimp, it’s finished with Meyer lemon for a clean, bright note. The result is a comforting yet elegant spring dish that’s fresh, light and luscious.
When making risotto, remember these simple but important rules for best results. Always purchase arborio rice, which is known for its high starch content. The starch will be “agitated” while stirring the rice, which yields a delicious creamy risotto. The rice grains should be lightly toasted in the pan before adding any liquid. This step protects the grains from bursting while cooking. And be sure to stir the risotto constantly — or nearly constantly — while cooking to prevent it from sticking and to help the rice release its starch.
Ingredients
- 12 oz asparagus, ends trimmed, cut into bite-size pieces
- 1/2 cup fresh shelled peas
- Extra-virgin olive oil
- 1 pound large shrimp, shelled and deveined
- Kosher salt
- Freshly ground black pepper
- 6 cups chicken stock
- 1/2 small yellow onion, finely chopped
- 1 1/2 cups arborio rice
- 1/2 cup dry, unoaked white wine
- 1/4 cup finely grated Parmigiano-Reggiano cheese
- 1 tbs fresh Meyer lemon juice
- 2 tbs chopped Italian parsley leaves and/or dill sprigs, plus more for garnish
- 1 tsp finely grated Meyer lemon zest
Directions
1. Bring a large saucepan of salted water to a rolling boil. Add the asparagus and peas and blanch the vegetables until they brighten in color and are crisp-tender, 1–2 minutes. Drain and rinse under cold water to stop the cooking process. Set aside.
2. Add 1 tbs oil to a large skillet. Add the shrimp and lightly season with salt and black pepper. Cook until just cooked through the center, about 4 minutes, turning once. Transfer to another plate.
3. Bring the stock to a simmer in a medium saucepan. Reduce the heat to low and keep warm.
4. Heat 1 tbs oil in a separate deep skillet or pot over medium heat. Add the onion and season with a pinch of salt. Sauté until the onion is soft and translucent without coloring, 2–3 minutes.
5. Stir in the rice and cook until the rice is well coated and lightly toasted, stirring constantly, about 1 minute. Pour in the wine and stir until the wine is absorbed, about 1 minute more.
6. Add 1 cup stock and stir until the liquid is absorbed. Continue adding the stock, 1/2 cup at a time, stirring until the liquid is nearly absorbed before adding the next 1/2 cup. When the last 1/2 cup is added to the pot and the rice is al dente, stir in the asparagus, peas and shrimp.
7. Remove the pan from the heat and stir in the cheese, lemon juice, parsley, dill and lemon zest. Season to taste with salt and black pepper.
8. Serve immediately, garnished with additional parsley or dill, if desired.
Serves 4
DISH DETAILS: seafood, grains, rice, spring, summer, vegetable, gluten-free
Side Dishes
Spiced Carrots with Carrot Top Pesto
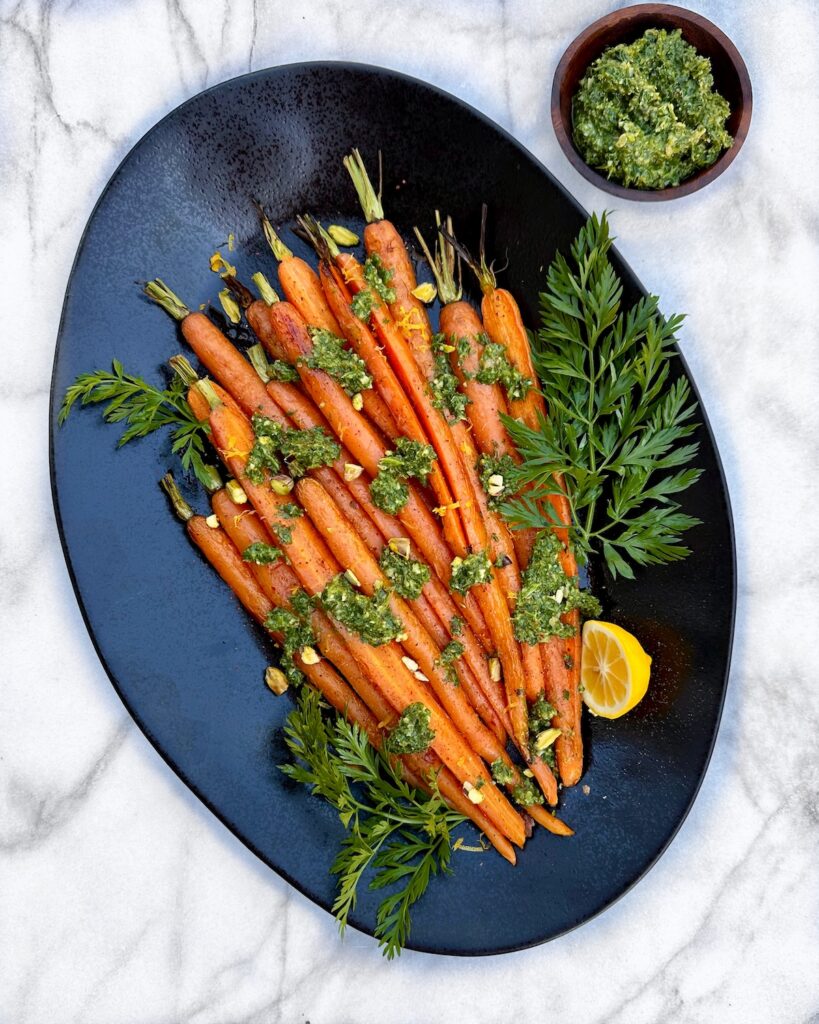
Carrots deserve our attention. Sure, these colorful roots are a blast of nutrients, naturally sweet and a go-to method to ensure we get our daily dose of vitamins. They undeniably play an important supporting role in stews, soups and sauces, or as a colorful flourish to leafy green salads and vegetable medleys. However, carrots are more than just a token aromatic or an accompaniment to a main dish. They are versatile and exciting and can easily be celebrated as the star attraction.
This recipe shines the spotlight on the entire carrot. It’s the center of the plate, dusted with a blend of North African spices. The sweetness of the carrot (which is a nutritious and tasty byproduct of many root vegetables) marries well with the blend of spices. A punchy pesto made the frilly green carrot tops elevate this simple vegetable to a vibrant side dish.
Ingredients
Pesto:
- 1 cup packed carrot tops, rinsed
- 1 cup packed cilantro leaves and tender stems
- 1/4 cup packed mint leaves
- Juice of one lemon
- Zest of 1/2 lemon
- 1/2 teaspoon kosher salt
- 1/4 cup shelled unsalted pistachios
- 1/3 cup extra-virgin olive oil, or more as needed
Carrots:
- 2 bunches of carrots, peeled, ends trimmed
- 1 tablespoon extra-virgin olive oil
- 1 teaspoon ground cumin
- 1/2 teaspoon ground coriander
- 1/2 teaspoon smoked paprika
- 1/4 teaspoon cayenne pepper
- Kosher salt
- Freshly ground black pepper
- Finely grated lemon zest, for garnish
- Chopped shelled unsalted pistachios, for garnish
Directions
1. Prep: Heat the oven to 425°F. Line a rimmed baking sheet with parchment.
2. Combine all the pesto ingredients, except the oil, in the bowl of a food processor. Pulse to coarsely chop. Add the oil and pulse to achieve a chunky but pourable consistency, adding additional oil if necessary.
3. If the carrots are thick, halve lengthwise. Place in a large bowl with the oil and toss to coat. Sprinkle the cumin, coriander, paprika and cayenne over the carrots and toss again.
4. Spread the carrots in one layer on the prepared baking sheet. Season with salt and black pepper. Transfer to the oven and roast until tender and lightly charred in spots, about 25 minutes, depending on the thickness of the carrots.
5. Remove from the oven. Transfer to a serving platter. Serve warm or at room temperature. Before serving, lightly drizzle the pesto over and around the carrots. Garnish with lemon zest and the pistachios. Serve with the remaining pesto.
Serves 4 to 6, yields about 3/4 cups of pesto
DISH DETAILS: vegetable, vegetarian, spring, summer, fall, pesto, salsa, gluten-free, entertaining, Easter
Chermoula Eggplant with Preserved Lemon Gremolata
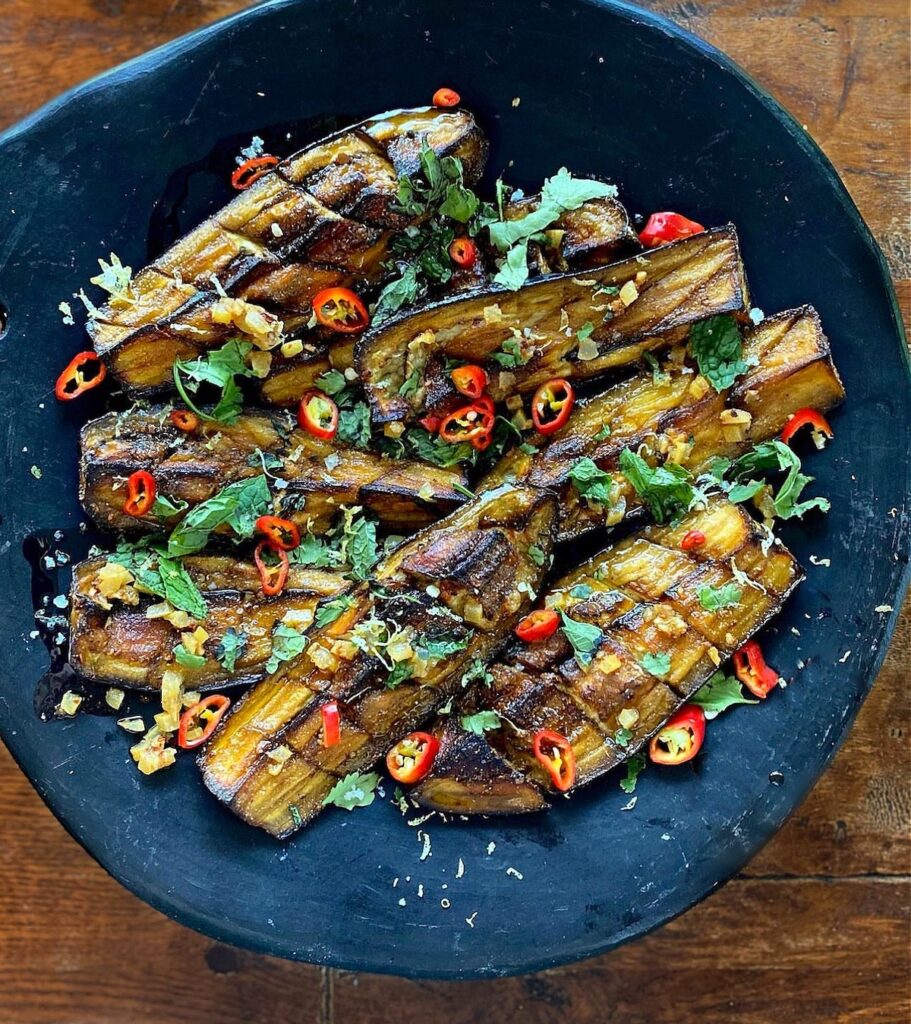
Eggplants love the grill. A simple brush of olive oil, a sprinkle of salt and the fire of the grill are all that’s needed to transform glossy, spongy eggplants into smoky, crisp and squidgy versions of themselves.
Eggplants — also known as aubergines — are members of the nightshade family. Low in calories and rich in vitamins and nutrients, such as vitamins C, manganese and potassium, eggplants are also a good source of fiber and antioxidants. While shiny purple globe eggplants may be the most well-known variety, eggplants come in a smattering of shapes and colors, with white, mauve and striped skins, and narrow, round and pear shapes. They share a meaty interior that becomes soft and creamy when roasted or grilled, and a neutral flavor that obligingly absorbs the flavors and aromas of smoke, spice and marinades.
In this recipe, eggplants hit the grill, basted with a North African spice-infused oil. A leafy herbaceous gremolata studded with bits of preserved lemon brightens and finishes the dish. Use any variety of eggplant or a combination of varieties for a diverse presentation. Serve the eggplant warm or at room temperature as a side dish, or sprinkle with crumbled feta and toasted pine nuts for a light vegetarian main dish.
Ingredients
Pesto:
- 2/3 cup extra-virgin olive oil
- 2 garlic cloves, grated
- 1 teaspoon ground cumin
- 1 teaspoon ground coriander
- 1 teaspoon sweet paprika
- 1/2 teaspoon freshly ground black pepper
- 2 pounds eggplant (4 to 6 long narrow eggplants)
- Kosher salt
- Aleppo pepper flakes
- 1/4 cup chopped fresh Italian parsley leaves
- 1/4 cup chopped fresh mint leaves
- 2 tablespoons finely diced preserved lemon (or 1 teaspoon finely grated fresh lemon zest)
- 1 to 2 red chile peppers, such Fresno or Jimmy Nardello, thinly sliced
Directions
1. Combine the oil, garlic, cumin, coriander, paprika and black pepper in a bowl.
2. Cut off the stems of the eggplant. Cut any long, narrow eggplants lengthwise into 4 to 6 wedges. Slice any round or globe eggplants into 1/2 -inch-thick planks.
3. Score the wedges or slices on the diagonal with shallow crisscross incisions, cutting through the flesh without piercing the other side. (This is an important step, as it allows the flavorful oil to infuse the flesh, while providing lots of ridges and edges to crisp and char while cooking.) Liberally brush the cut sides of the eggplant and in the crevices with the oil. Evenly season with salt and a sprinkle of Aleppo flakes.
4. Prepare the grill for indirect cooking over medium-high heat (or heat the oven to 400°F).
5. Arrange the wedges on the grill over indirect medium-high heat. Cook, basting occasionally with the remaining oil, until the eggplant wedges are soft, squidgy and charred in spots, about 30 minutes (or arrange in one layer on a rimmed baking sheet lined with parchment and roast in the oven, basting occasionally).
6. Arrange the eggplant on a serving platter. Sprinkle the parsley, mint and lemon over. Garnish with the chiles. Serve warm or at room temperature.
Serves 4 as a side dish
DISH DETAILS: vegetable, side-dish, gluten-free, summer, fall
Balsamic Braised Radicchio
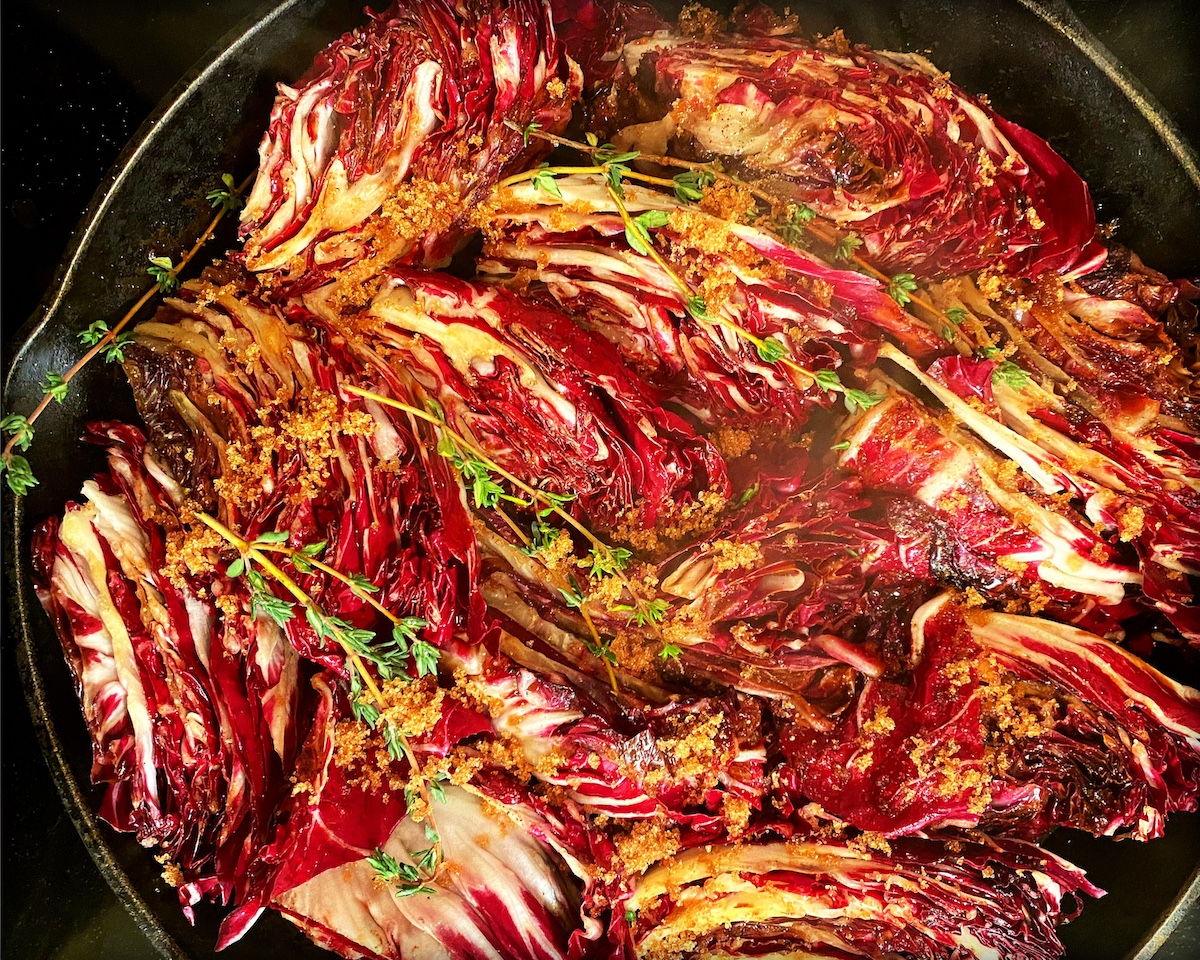
Chicories are our winter warriors. Often called winter greens, chicories are a family of hardy leafy vegetables, which include radicchio, endive, frisée, puntarella and escarole. The term “greens” can be misleading, since chicories are distinguished by a colorful range of magentas and pinks, ice-whites and pale-yellows, which they flamboyantly display on their frilly, frizzy and spiky leaves.
Chicory leaves are notoriously bitter. When they are in season, they are also crisp, juicy, nutty and mildly sweet which provides a refreshing contrast in flavor. They are healthy to boot, too. Fiber-rich and loaded with vitamins C, B and K and nutrients such as iron, zinc, copper and potassium, chicories are cold weather warriors that will fight to keep you healthy throughout the winter season.
When preparing chicories, it’s best to lean into their robust qualities, rather than pretend they are a substitute for mild-mannered lettuce. Team them up with equally strong flavors in salads: sweet and sharp dressings, astringent citrus, smoky bacon, fruit and nuts. Don’t be shy about using a pinch or two of sugar, which will reign in their natural bitterness. Thanks to their sturdiness, chicories are also great for braising, which is an appealing (and warm) way to get your veggies in the dead of winter.
Ingredients
- 4 to 5 firm heads of radicchio, medium to large sized
- 1 tablespoon olive oil
- 3 to 4 thyme sprigs, plus fresh leaves for garnish
- Kosher salt
- Freshly ground black pepper
- 1/2 cup balsamic vinegar
- Juice of 1/2 orange
- Zest of 1/2 orange, plus more for garnish
- 3 to 4 tablespoons packed light brown sugar
Directions
1. Halve the radicchios top to stem. Cut out the white stem and core with a paring knife, then cut each half into 2 to 3 wedges.
2. Heat the oil in a large skillet over medium heat. Arrange the wedges snugly in the skillet, cut side down. Cook until they take on color, 2 to 3 minutes. Using tongs, turn the wedges so that the other cut side is down in the skillet, and cook about 2 minutes more.
3. Nestle the thyme sprigs between the wedges and season evenly with salt and black pepper. Drizzle the balsamic vinegar over the radicchio. Squeeze the orange juice and sprinkle the zest over the radicchio, then sprinkle the brown sugar over the wedges.
4. Partially cover the skillet and simmer over medium heat until the radicchio is crisp-tender when pierced with a knife through the base, 12 to 15 minutes, carefully turning the wedges once or twice. Remove the cover and continue to simmer until the radicchio is soft and wilted, 5 to 7 minutes more, turning once or twice.
5. Using tongs, transfer the radicchio to a serving dish, gently squeezing any excess liquid back into the skillet. Continue to simmer the braising liquid until reduced to a syrupy consistency, 1 to 2 minutes. (Watch carefully as it will quickly reduce.)
6. Drizzle the syrup over the radicchio. Add more salt and pepper to taste. Garnish with fresh thyme leaves and orange zest. Serve warm.
Serves 4 to 5 as a side dish
DISH DETAILS: side dish, vegetarian, winter, fall, gluten-free
A Celery Root Recipe
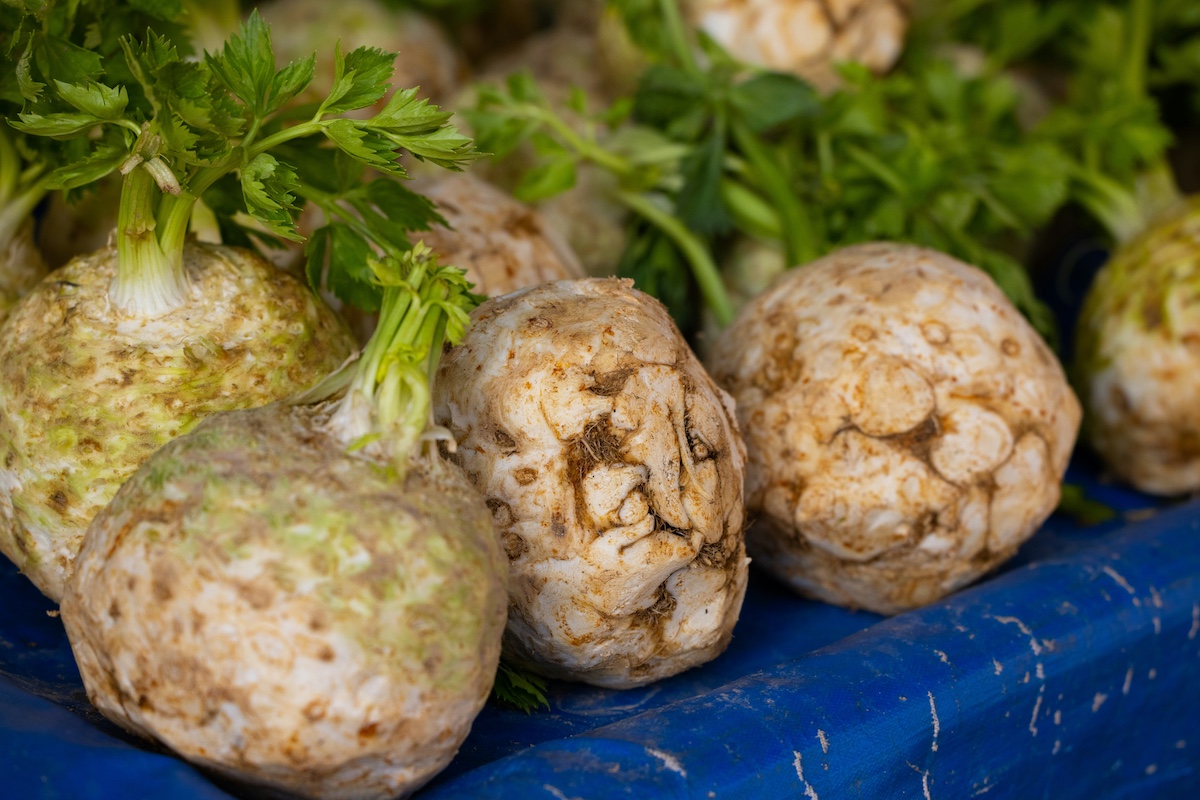
Looks can be deceiving. Celery root is hard to miss at the farmers market. Nestled among the season’s decorative squash, leafy kales and plump sprouts, it’s the gnarly pockmarked orb, wrapped in hairy, crooked roots with a mop of unruly leafy stalks sprouting from its craggy bulb.
Don’t let the knobby, cartoonish exterior put you off. Celery root — or celeriac — is the dark horse of tubers with a confounding name and myriad uses. While related to celery, it is not the root of the celery stalk plant. And while it’s called a root, it’s technically a nutrient-dense tuber, which happens to be rich in B, C and K vitamins, plus potassium, phosphorus, iron, calcium and manganese. Not bad for a bumpy bulb.
When the earthen-caked skin is cut away, a milky white interior is revealed. Mildly fragrant with celery, it can be eaten raw, shredded in salads and slaws, or even quick pickled. When cooked, its flavor is smooth, mellow and slightly sweet, especially when roasted. It adds subtle depth and dimension to mashes, gratins and stews and can nobly stand alone in a purée or creamy soup.
When buying celery root, choose a firm, medium-sized root, no larger than a grapefruit, as very large roots may be woody. Trim any green stalks and leaves and store unpeeled in the refrigerator for up to three weeks. To prepare, carefully cut away the mottled exterior to reveal the white bulb. Once cut, the flesh will discolor when exposed to air, so use right away or submerge in cool lemon water until use.
Celery Root Purée
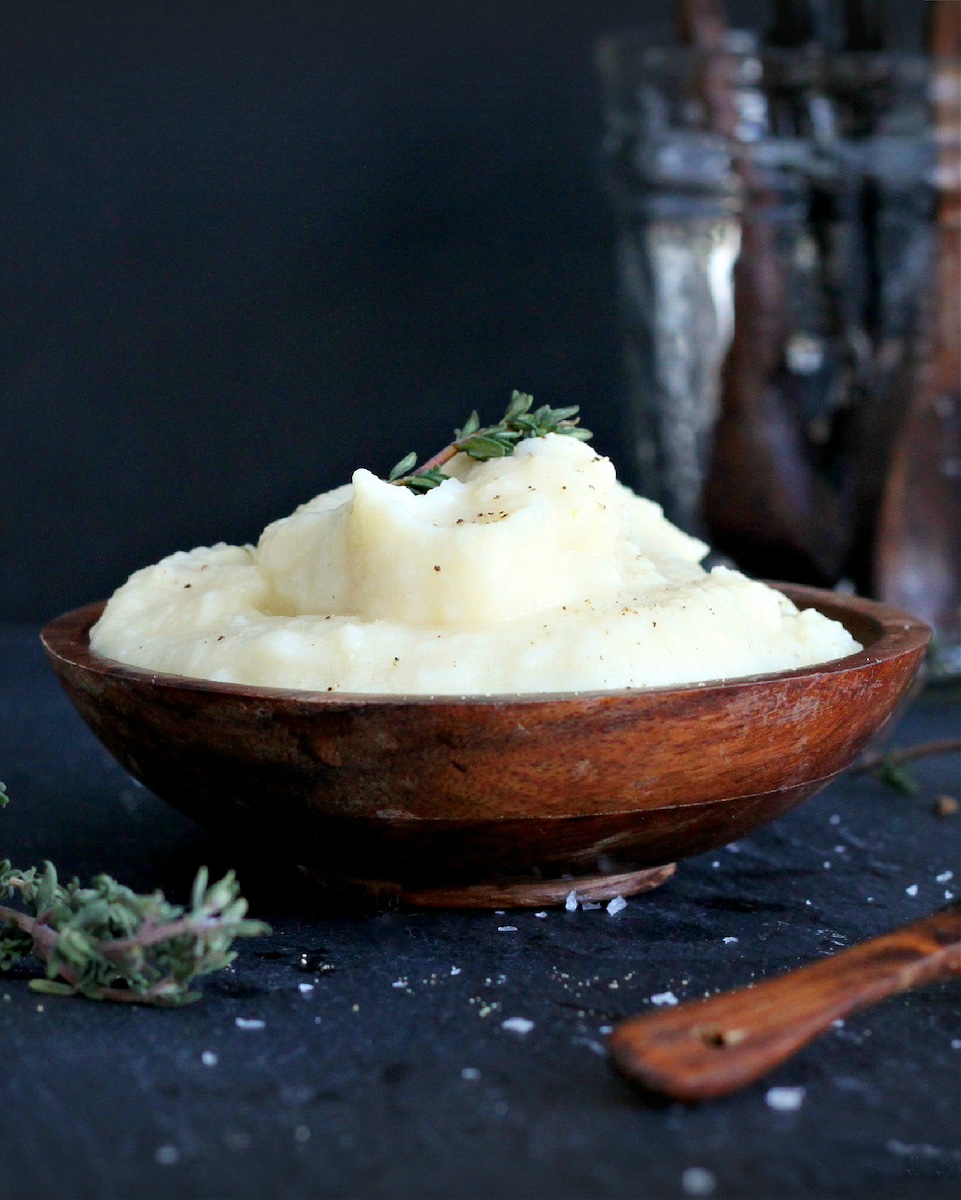
Ingredients
- 2 1/2 pounds celery root, stalks trimmed
- 4 whole peeled garlic cloves, smashed but intact
- 2 to 3 cups chicken or vegetable stock
- 2 thyme sprigs
- 2 tablespoons heavy cream
- 1 tablespoon unsalted butter, softened
- 1/2 teaspoon kosher salt, or more to taste
- Pinch of ground nutmeg
Directions
1. Peel the celery roots, removing any trace of the outer skin. Chop in 1/2-inch pieces and place in a pot. Add the stock, garlic and thyme. There should be enough liquid to cover the celery root; add more if needed. Bring to a boil, then cover the pot and simmer over medium-low heat until the celery root is very tender, 20 to 25 minutes. If the pan begins to dry out, add more stock or water to prevent scorching. Discard the thyme sprigs.
2. With a slotted spoon, transfer the celery root to the bowl of a food processor. Add the cream, butter, salt and nutmeg and process until smooth. If too thick, add some of the cooking liquid and process to your desired consistency. Taste for seasoning and add more salt if desired.
3. Serve warm.
Yields about 1 1/2 to 2 cups; serves 2 to 4 as a side dish
DISH DETAILS: vegetable, vegetarian, gluten-free, mash, winter, fall, entertaining, Thanksgiving
Desserts
When the earthen-caked skin is cut away, a milky white interior is revealed. Mildly fragrant with celery, it can be eaten raw, shredded in salads and slaws, or even quick pickled. When cooked, its flavor is smooth, mellow and slightly sweet, especially when roasted. It adds subtle depth and dimension to mashes, gratins and stews and can nobly stand alone in a purée or creamy soup.
When buying celery root, choose a firm, medium-sized root, no larger than a grapefruit, as very large roots may be woody. Trim any green stalks and leaves and store unpeeled in the refrigerator for up to three weeks. To prepare, carefully cut away the mottled exterior to reveal the white bulb. Once cut, the flesh will discolor when exposed to air, so use right away or submerge in cool lemon water until use.
Sunken Pear Cake
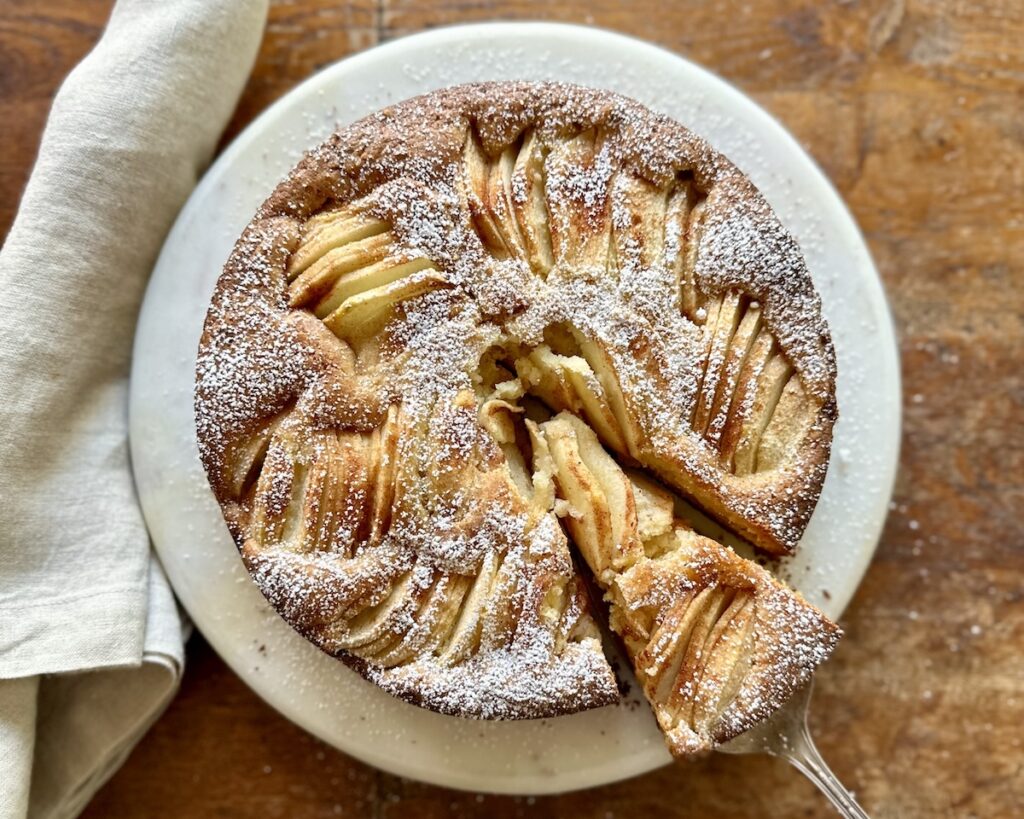
Move over stone fruit; it’s time to make room for pears. As the temperatures inch lower and summer produce wanes, hardy pears step into the spotlight. Pears are one of fall’s most versatile fruits. Depending on the variety, they can hold their texture when baked, or soften and meld into a dish when cooked. Pears shine in both sweet and savory dishes — baked into crisps and tarts, poached in wine or sliced raw into salads. Their sweet perfumed flavor pairs beautifully with warm spices like cinnamon, cardamom and nutmeg, as well as rich ingredients like caramel, prosciutto and creamy cheeses.
This cake is inspired by a German cake, Versunkener Apfelkuchen, or sunken apple cake. As the name implies, it’s traditionally made with another fall favorite — apples — but it can also be made with pears. It’s a simple cake, not overly sweet and modestly dusted with warm spices, which provides a gentle canvas to showcase the subtle flavors of the pear. Choose a firm pear, such as Bartlett or Anjou, which will hold its shape while baking. This is an all-day cake, meant to be enjoyed with coffee and tea, as a dessert or even for breakfast.
Ingredients
- 1 cup all-purpose flour
- 1/2 cup almond flour
- 2 teaspoons baking powder
- 1/2 teaspoon kosher salt
- 1 teaspoon ground cardamom
- 3 medium pears, such as Bartlett or Anjou
- Fresh lemon juice for brushing
- 1/2 cup (8 tablespoons) unsalted butter, room temperature
- 2/3 cup plus 2 tablespoons granulated sugar
- 3 large eggs, room temperature
- 1 teaspoon finely grated lemon zest
- 1 teaspoon vanilla extract
- 1/2 teaspoon almond extract
- 1/4 cup whole milk
- Powdered sugar, for sprinkling
Directions
1. Heat the oven to 350°F. Butter the sides of a 9-inch springform pan and line the bottom with parchment.
2. Whisk the flour, baking powder, salt and cardamom in a bowl.
3. Peel and core the pears. Thinly slice, keeping the shape of the pear intact, as much as possible. Brush with lemon juice to prevent discoloring.
4. Beat the sugar and butter, in the bowl of an electric mixer fitted with a paddle attachment, until light and creamy, about 3 minutes. Add the eggs, one at a time, mixing to thoroughly incorporate before the next addition. Mix in the lemon zest and the vanilla and almond extracts.
5. Add half of the dry ingredients and mix on low speed to incorporate. Mix in the milk, then add the remaining dry ingredients. Mix to combine, without overmixing.
6. Spread the batter in the prepared pan. Arrange the pear slices in the batter, slightly fanning the slices and gently pressing to slightly submerge. (The dough will rise around the pears as the cake bakes, so there is no need to fully submerge the pear.)
7. Bake in the oven until the cake is golden brown and a toothpick inserted comes clean with a few crumbs sticking, about 50 minutes. Cool on a rack for 10 minutes, then release the sides. Cool the cake to slightly warm or room temperature.
8. Sprinkle with powdered sugar and serve as is or with whipped cream. The cake can be stored in an airtight container at room temperature for up to 2 days.
Makes one (9-inch) cake
DISH DETAILS: dessert, cake, easy, fall, winter, entertaining, Thanksgiving
Strawberry Eton Mess

You say summer, we say strawberries. Nothing quite captures the essence of the summer season like fresh strawberries at the farmers market. When at their peak, sweet, plump strawberries fill the market tables, encouraging indulgence. Go ahead and grab a carton (or two or three, since you’ll likely polish off a box on your way home). There’s no need for restraint.
Strawberries are nature’s candy. Whether eaten straight-up, blended into smoothies or baked into desserts, farm-fresh strawberries are the essence of seasonal eating, and they are healthy, to boot. Not only are they naturally low in calories, strawberries are packed with nutrients, including vitamin C, potassium, manganese and folate.
Set aside a pint of the berries to make this dessert. An Eton Mess is a British dessert that embraces the strawberry and lets it shine. It’s essentially a deconstructed pavlova: a mishmash of whipped cream and crushed meringue enfolding juicy berries, which is dolloped into a glass or bowl to serve. It’s easy and fun to make — you do get to smash things, after all — and precision is not involved.
Note that you can make this dessert in advance of serving, but for best results assemble shortly before serving to prevent the meringues from becoming too soggy. For the meringues, feel free to use store-bought vanilla meringues, which can be found in well-stocked markets and bakeries.
Ingredients
- 12 ounces fresh strawberries
- 1 tablespoon granulated sugar
- 1/2 teaspoon finely grated lemon zest, plus more for garnish
- 1 1/2 cups chilled heavy cream
- 2 tablespoons sifted confectioner’s sugar
- 1/2 teaspoon vanilla extract
- 1 1/2 cups coarsely crumbled vanilla meringues, plus more for sprinkling
Directions
1. Set aside 3 unblemished strawberries and cut in half. Hull and quarter the remaining berries. Place half of the strawberries in a bowl and add the 1 tablespoon granulated sugar. Gently press with a fork to coarsely mash. Add the remaining berries and the lemon zest and stir to combine.
2. Combine the cream, confectioner’s sugar and vanilla in the bowl of an electric mixer fitted with a whisk attachment. Beat until soft peaks form. Add the strawberries and about 2/3 of the meringues to the cream and gently fold into the cream, leaving streaks of berries visible.
3. Spoon into individual serving glasses or small bowls. Sprinkle additional crushed meringues over the top. Garnish with a half strawberry and additional lemon zest.
4. Beat the sugar and butter, in the bowl of an electric mixer fitted with a paddle attachment, until light and creamy, about 3 minutes. Add the eggs, one at a time, mixing to thoroughly incorporate before the next addition. Mix in the lemon zest and the vanilla and almond extracts.
5. Add half of the dry ingredients and mix on low speed to incorporate. Mix in the milk, then add the remaining dry ingredients. Mix to combine, without overmixing.
6. Spread the batter in the prepared pan. Arrange the pear slices in the batter, slightly fanning the slices and gently pressing to slightly submerge. (The dough will rise around the pears as the cake bakes, so there is no need to fully submerge the pear.)
7. Bake in the oven until the cake is golden brown and a toothpick inserted comes clean with a few crumbs sticking, about 50 minutes. Cool on a rack for 10 minutes, then release the sides. Cool the cake to slightly warm or room temperature.
8. Sprinkle with powdered sugar and serve as is or with whipped cream. The cake can be stored in an airtight container at room temperature for up to 2 days.
Serves 6
DISH DETAILS: fruit, easy, summer, gluten-free, whipped cream, entertaining, outdoor entertaining, July 4th
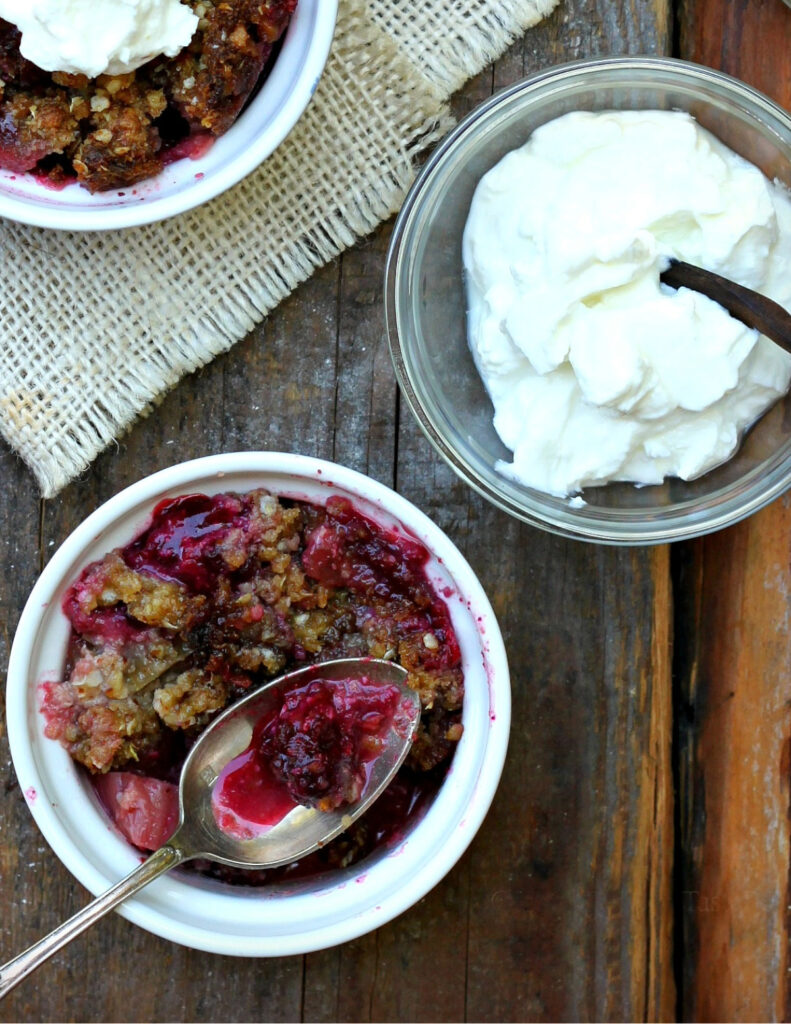
Rhubarb and Berry Crisp
From late April to May, rosy rhubarb ushers in the spring season at the farmers market. The celery-like stalks are awash in vibrant hues of crimson, pink, red and green. Is it a fruit or vegetable? It’s a fair question due to the rhubarb’s inherent tartness. Botanically, rhubarb is classified as a vegetable, however it’s often put to culinary use as a fruit. The stalks are typically cooked. While the stalks can be eaten raw in small quantities, the leaves are poisonous and should be discarded. What is not questionable is rhubarb’s astringency, which may sound off-putting, but is, in fact, its key attribute. It lends a refreshing zing and vegetal note to sugary desserts, which helps to balance any cloying sweetness.
When choosing rhubarb, select firm, crisp stalks that are red and pink in color, with hints of green. Discard any leaves, which are toxic. To prepare, trim the ends and wash the stalks. Add rhubarb to fruit pies, crisps, jams, compotes and sauces. While strawberries are a classic fruit pairing, other sweet berries are a great addition.
Sweet-tart raspberries and mellow blackberries join rhubarb in this fruit crisp. Additional sweetness is gleaned from the nutty, crunchy topping, which is gluten-free. The recipe yields a generous amount of topping, so layer it on thickly. Alternatively, freeze any extras for up to one month for your next crisp.
Ingredients
Topping:
- 3/4 cup almond flour
- 3/4 cup rolled oats (gluten-free or regular)
- 1/2 cup walnuts
- 1/2 cup packed dark brown sugar
- 1/4 cup granulated sugar
- 1/2 teaspoon cinnamon
- 1/4 teaspoon kosher salt
- 3/4 cup (12 tablespoons) unsalted butter, chilled
Filling:
- 1 1/2 pounds rhubarb, cut into 1/2-inch pieces (about 4 cups)
- 8 ounces fresh blackberries and/or raspberries
- 1/4 cup granulated sugar
- 1 tablespoon orange juice
- 1 tablespoon cornstarch
- 1 teaspoon finely grated orange zest
- Pinch of kosher salt
Directions
1. Preheat the oven to 350°F. Combine all the topping ingredients, except the butter, in the bowl of a food processor and pulse to coarsely chop the walnuts. Add the butter and pulse until the mixture resembles coarse meal.
2. Place the rhubarb and the berries in a bowl. Sprinkle the sugar over and gently stir to combine. Whisk the lemon juice and cornstarch in a small bowl. Pour over the fruit, add the zest and gently stir to coat. Spread the fruit in an 8 by 8-inch (or similar size) baking dish (or divide the fruit between individual gratin dishes). Evenly spread the topping over the fruit.
3. Bake in the oven until the topping is golden brown, the rhubarb is soft and the juices are bubbling, about 40 minutes. (If the topping browns before the filling is fully cooked, then loosely cover with foil to prevent burning.) Remove and cool. Serve slightly warm or at room temperature with whipped cream or vanilla ice cream.
Serves 6
DISH DETAILS: fruit, crisp, crumble, spring, baked, gluten-free option
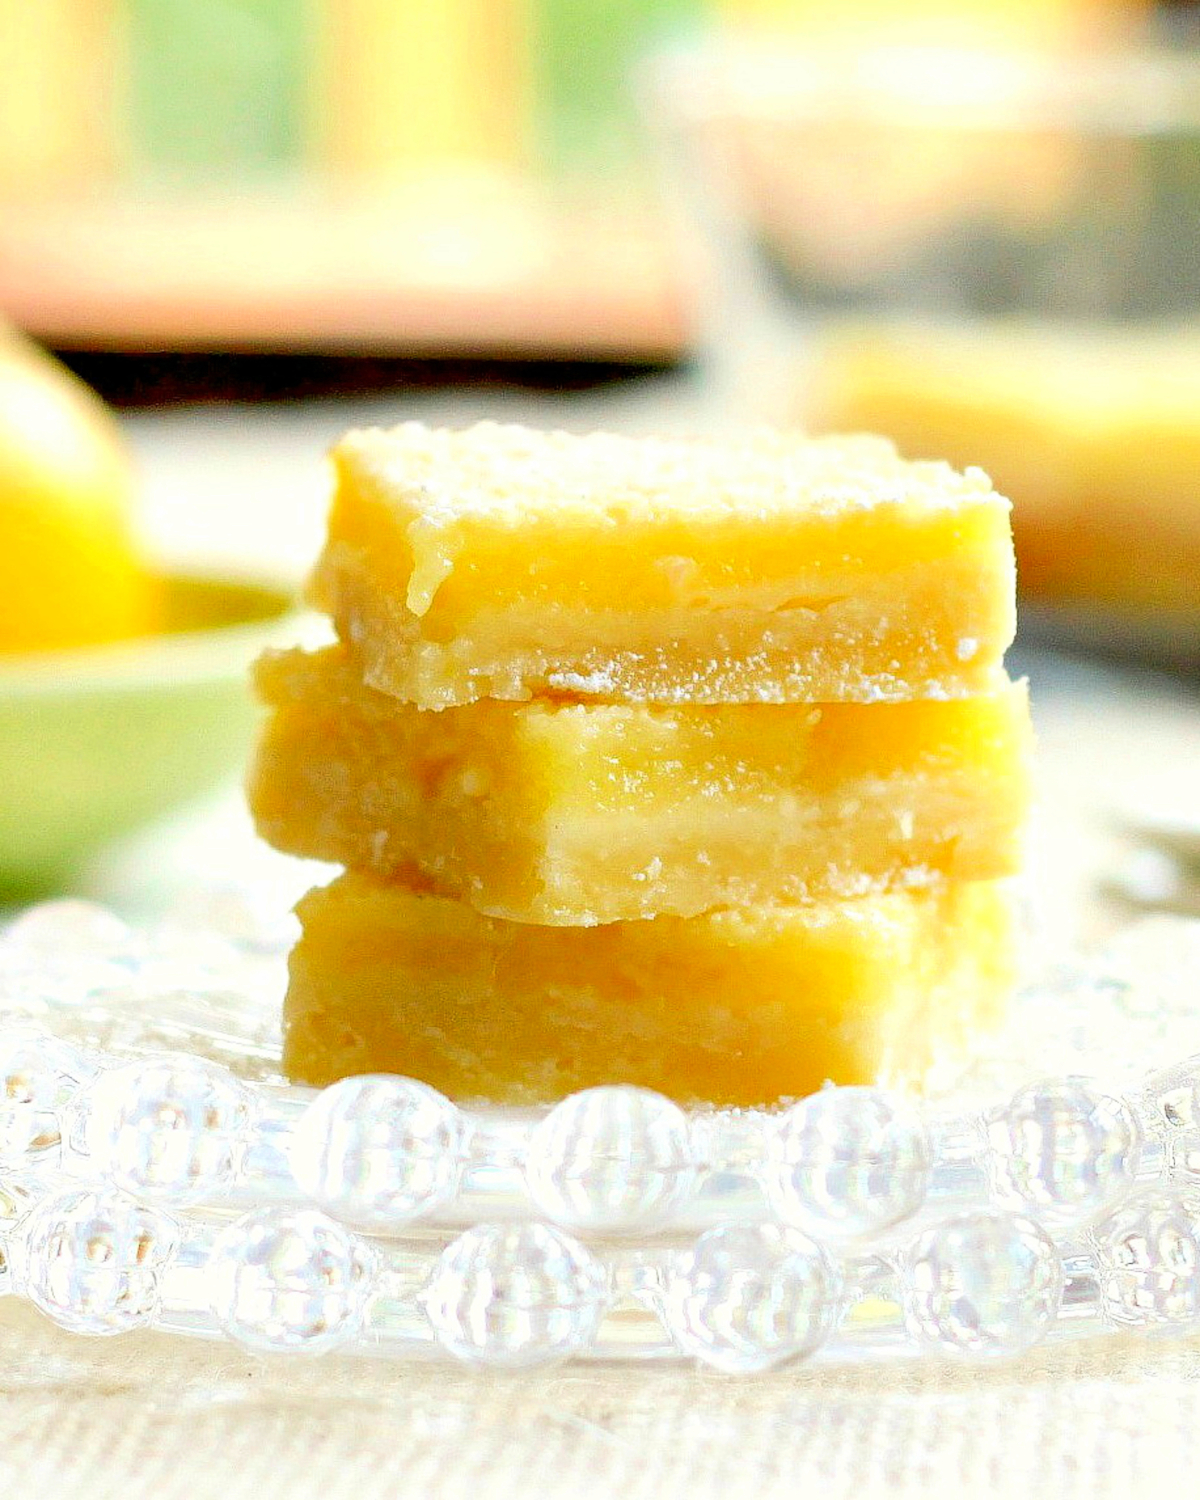
Lemon Bars
Late winter offers up bushels of citrus at the farmers markets. It’s an embarrassment of riches with lemons, limes, oranges, grapefruit, pomelos and myriad hybrids vying for attention. They are worthy of notice: Citrus fruits are considered a superfood. They are naturally low in calories and rich in nutrients, including immunity-boosting vitamin C, as well as fiber, potassium, magnesium and various plant compounds which have antioxidant and anti-inflammatory effects. Let these juicy, tangy fruits brighten your plate and boost your health in the cold weather season.
Sweet-tart raspberries and mellow blackberries join rhubarb in this fruit crisp. Additional sweetness is gleaned from the nutty, crunchy topping, which is gluten-free. The recipe yields a generous amount of topping, so layer it on thickly. Alternatively, freeze any extras for up to one month for your next crisp.
The infallible lemon shines in these zingy bars which promise to perk up your palate and uplift your mood (which is another contributor to good health). It’s no surprise that the key to a good lemon bar is an intensely lemony filling. It should pack a wallop of puckery tartness balanced by just enough sweetness without being cloying. For this task, rely on the Eureka lemon, the ubiquitous fruit readily found in our markets and gardens. (As much as we love its sweet and sunny cousin, the Meyer lemon, it lacks the cheek-sucking tartness that these lemon bars demand.) Eureka lemons have the requisite zing for the zesty curd that slathers the buttery shortbread base. A smidge of sea salt is the final flourish, which deftly enhances the lemon flavor and tames any sugary excess.
Ingredients
Crust:
- 2 cups all-purpose flour
- 1/2 cup confectioners’ sugar (powdered sugar)
- 1/2 teaspoon kosher salt
- 1 cup unsalted butter, slightly softened but still cool, cut into cubes
Filling:
- 4 large eggs, room temperature
- 1 cup granulated sugar
- 2/3 cup freshly squeezed lemon juice
- 1/4 cup all-purpose flour, sifted
- 1 tablespoon finely grated lemon zest
- 1/4 teaspoon kosher salt
- Confectioners’ sugar for sprinkling
- Sea salt flakes, such as Maldon, for sprinkling
Directions
1. Heat the oven to 350°F. Butter a 9-inch square baking pan, then line the pan with parchment.
2. Combine the shortbread ingredients in the bowl of an electric mixer fitted with a paddle attachment. Mix until the dough is lumpy and begins to stick together. Dump the dough into the prepared pan and evenly press the dough to cover the bottom of the pan.
3. Bake the crust until it just begins to turn golden, about 20 minutes. Remove from oven, but do not turn off the oven heat.
4. Whisk the filling ingredients together in a large bowl until blended. Pour the filling over the crust. Return the pan to the oven and bake until the filling is set but not coloring, about 25 minutes. Remove and cool completely on a rack.
5. Dust with confectioners’ sugar and lightly sprinkle with sea salt flakes. Cut into bars. Store in the refrigerator for up to 5 days.
Makes 16 (2-inch) square bars
DISH DETAILS: citrus, spring, winter, bars, dessert

Lynda Balslev is an award-winning cookbook author, recipe developer, and author of the nationally syndicated column TasteFood. Lynda attended Le Cordon Bleu École de Cuisine Paris and remained in Europe for more than 15 years, where she wrote and cooked in Switzerland and Denmark before a move brought her family to northern California. She is a regular contributor to print and digital media, and has authored six books on an array of culinary subjects including fermentation, dumplings, rice, whiskey, almonds, cheese, and the Swedish Fika coffee tradition.

